Days and Nights of Baja

Posted on 6 Comments

I was incredibly fortunate to have my first “work” trip of the new year be a Linblad/Nat Geo week-long Expedition to the Baja Peninsula. I soon discovered that the Sea of Cortez is an amazing place to set up a cubicle! My good friend, David Brommer, and I were sent down to showcase a ton of gear to the lucky 60+ guests of the tour, plus teach alongside famous Nat Geo/Traveler photographers Bob Krist, Michael Melford, and Ralph Lee Hopkins.

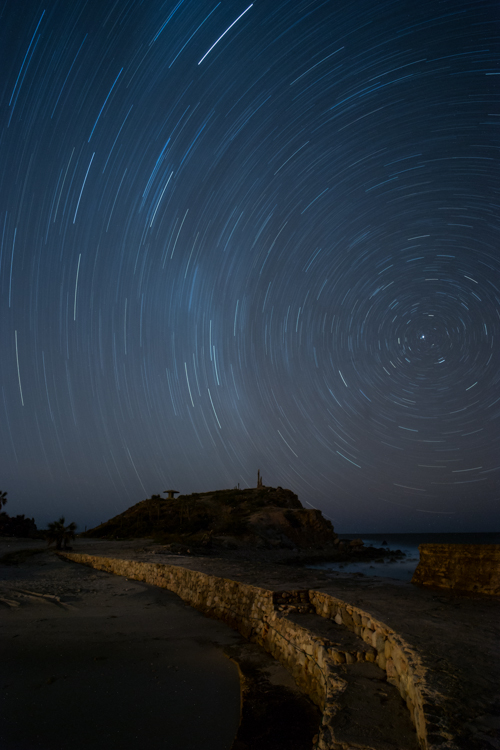
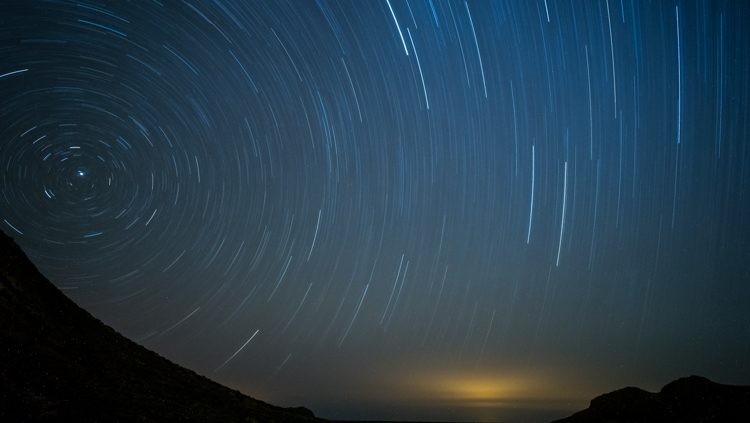
We flew into Cabo San Lucas, and after joining the rest of the tour, we took a 3 hour bus ride to the very remote and exclusive Las Cruces resort. First overwhelming impressions – the constant crashing of the waves along the shore and the bazillion stars shining brilliantly in the sky. Even though I was exhausted after a full days worth of traveling, the night sky drew me out to shoot some long exposures on the Fujifilm XE-1 and X Pro 1.

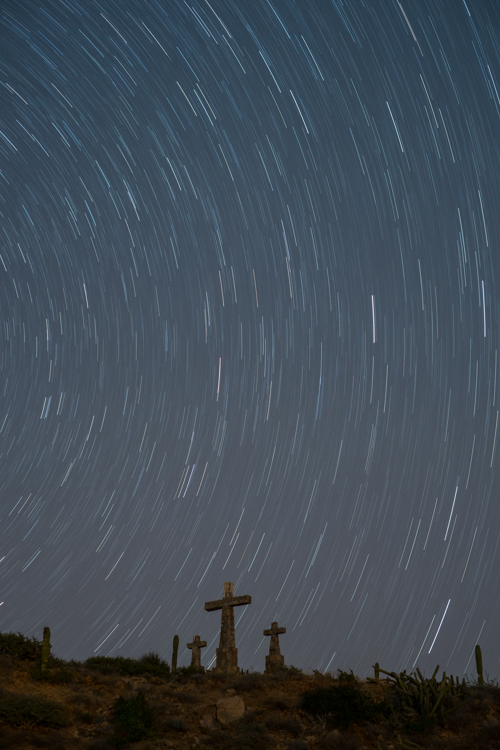
This first shot was taken along an old breaker/dock area that wasn’t doing a great job of stopping the waves from spilling over. I reluctantly left that camera to burn an hour long exposure and then set up the other rig just out of the picture in the upper left frame.
20130105_Cabo_019

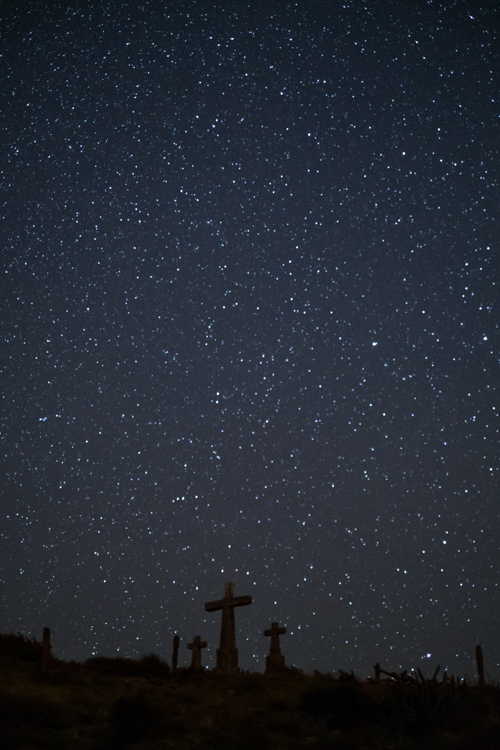
The area is called Las Cruces, because when Cortez landed here in 1535 he placed 3 crosses to commemerate his arrival in the land of supposed gold, but really lots of pearly oysters.
I’m torn between the celestial and the hour long star trail shot for which I like best. No moon was out and the sky was riddled with stars and satellites from the water to the mountains on the other side

20130105_Cabo.XE_015
20130105_Cabo.XE_016

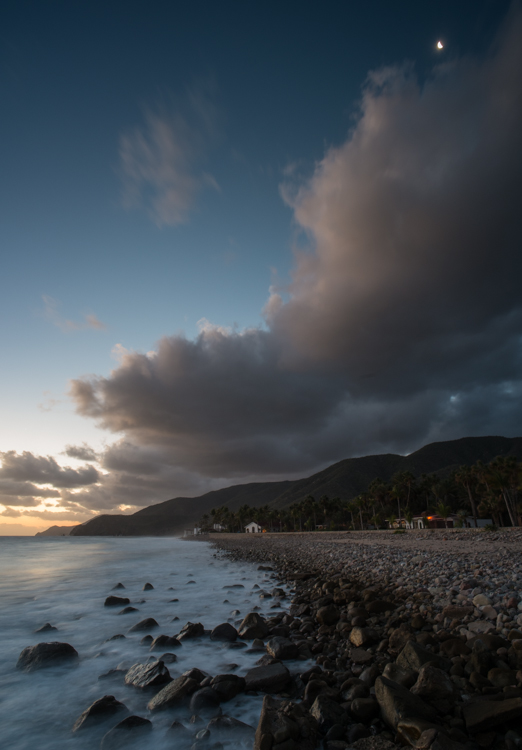
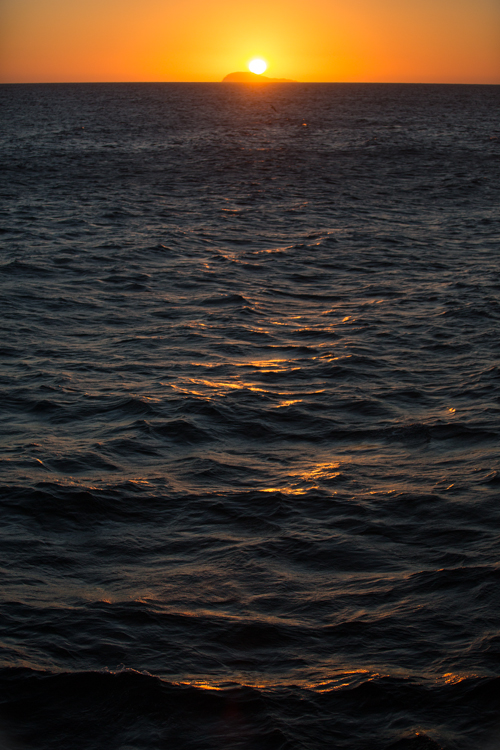
What really sucked  about this week was that I had to get up for the sunrise over some epic landscapes every morning. I’m not a 6am kinda guy…but work demanded it, so I showed up. I really loved this in between moment when the warm morning sun shared the same time and space as the cool night sky. This magic moment was fleeting as the sun quickly began it’s domination of the day-time.

20130105_Seabird.X1_016

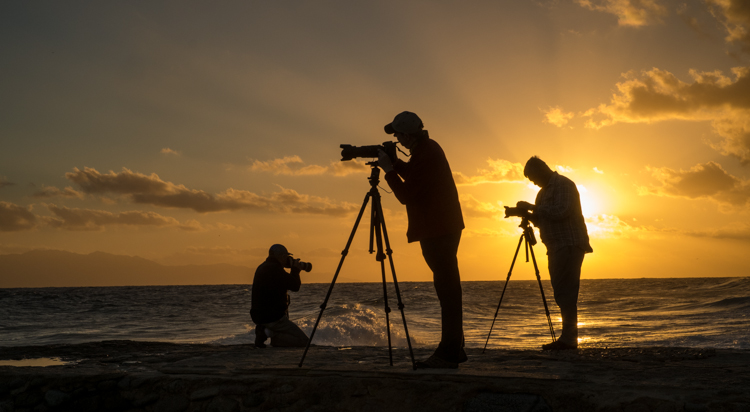
Bob Krist was talking a lot about creating moments that include people for storytelling and scale. I just love how the three philosophers are each pointing their camera in a different direction with the brilliant sunrise silhouetting them.

20130105_CaboXE_058
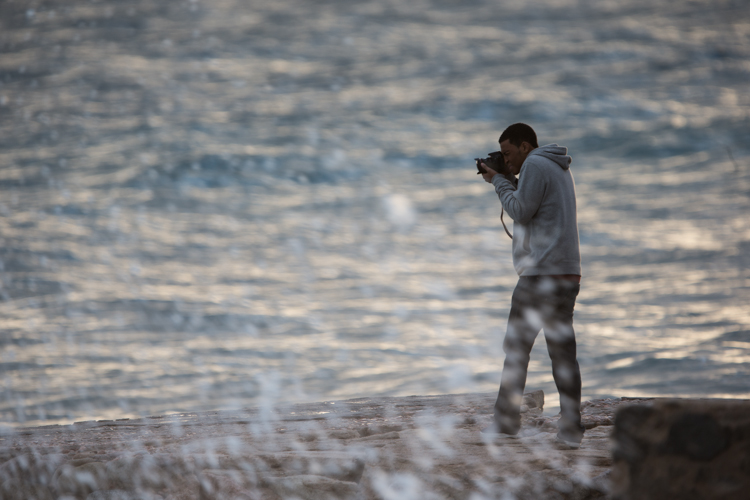
We had set up a Canon 1dx with a 300mm 2.8 lens and a 2x teleconverter for people to use on a tripod and gimbal head.  Here I caught some interesting wildlife – one of my favorite students Leonard, who tried every piece of gear we brought with us! This was almost the last siting of Leonard before he was swept to sea…luckily we were able to recover the Canon 8-15mm lens!

20130106_LasCruces_1dx_272

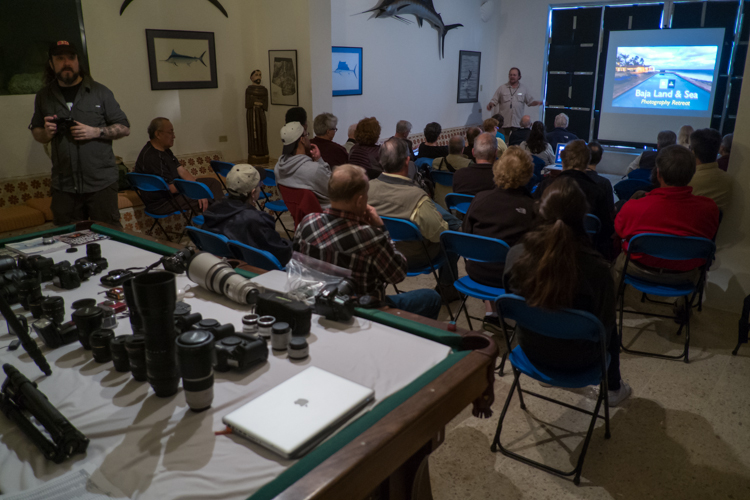
 The Expedition was a Land and Sea Adventure.  We started on land and shot the sunrise, ate breakfast, and then had several photography lectures through the high sun hours.  The classes covered the basics to inspiration.  I gave a talk on night photography and then led the students out on several night shoots. Here is a shot of Ralph giving his presentation and a sampling of all the gear that was available for the guests to use.

20130105_Seabird.X1_111

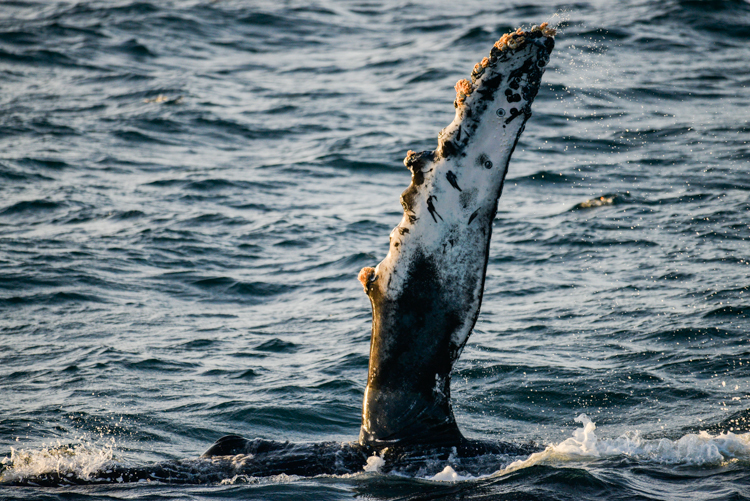
 On the 4th day we left the land for the sea.  We boarded Linblad’s Seabird in La Paz and got our sea legs ready.  We were incredibly fortunate as we did not have to go far before we were able  to witness whale sharks feeding!  I’m still working on that underwater video footage but if that riding with whale sharks wasn’t enough, for desert we witnessed two humpback whales breaching as the sun set along the horizon!

20130107_Seabird.5d3_240

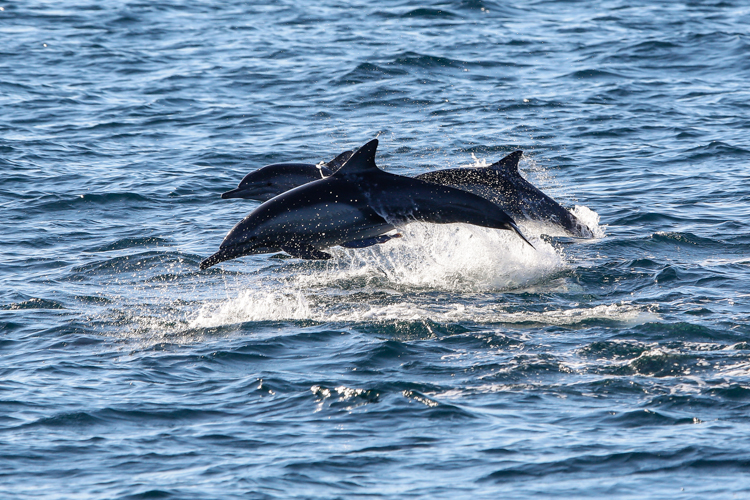
The next day, after a brilliant sunrise and breakfast, we raced herds of dolphins as they performed many acrobatic tricks around us! I’ve really never shot “wildlife” before and it is really tricky! Ralph called out camera settings, shutters blazed away and we tried to anticipate where the dolphin would break through the sea. Sometimes you just had to set the camera down, breathe, and take in all the beauty. Then fire away again! We photographed the dolphins for maybe 20 minutes and I ended up with over 700 shots! I had to do a quick edit afterwards, immediately deleting 250 missed shots. I probably ended up with 3 dolphin images that I could be proud of.

20130108_Seabird_336

                                                                                                                         Another 6:30 wake up call, another beautiful day in the Sea of Cortez.

20130109_Seabird.5d3_135


Part of the reason I was asked to join this expedition was to teach the night photography segment of the workshop. Most of the students were new to creating night scapes and we got 3 moonless evenings to experiment capturing stars and the trails that follow.  Below is a 1 hour exposure on with the Fujifilm X E1.  The Fuji X E1, X Pro 1, and  X100 are the most capable cameras of creating 1 hour exposures without the need for stacking or long exposure noise reduction.

20130109_Seabird.XE_155

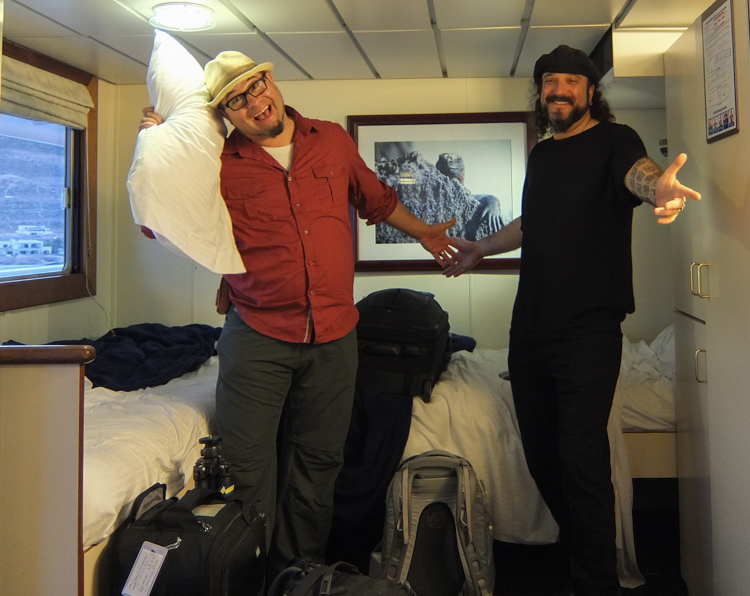
And then my coworker, good friend, co-teacher, and bunkmate – David Brommer and I, in our quarters!  I’d like to thank David for working hard on the relationship with B&H and Linblad/Nat Geo.  This was one of the coolest gigs that I have ever worked!  After swimming with the sea lions, I have now adapted them as my new spiritual animal!

But in all seriousness, it was an epic adventure.  We became great friends with the 65+ guests who signed up for the trip.  They were so thankful to have B&H reps on board and help them try out all the latest lenses – from 4.5mm to 500mm.  It was an honor to teach alongside with Bob, Michael, and Ralph.  And I have a newfound love and respect for wildlife and expeditions.  Linblad is one of the most professional organizations that I have ever dealt with.  The adventure starts when the sun rises and there are tons of opportunities for you to take advantage of the day.  Whether it be snorkeling with sea lions, kayaking, zodiac cruises, or just chilling at the beach.

20130111_Baja.XF_095

How to successfully shoot snow

Posted on


Allegheny Old Jail v3 ~ Fujifilm XE 1 with 18mm lens ~ 14s at f/8 ~ ISO 200

Winter is upon us and instead of hibernating, take advantage of the official Night Photography season!

I find winter night shoots to be more productive than the summer as I can shoot earlier and longer. There definitely can be challenges to photographing in the winter, especially in those colder locations in the world.  But when it snows there is magic to be made! So bundle up accordingly and I’m going to give you some tips on how to capture those snowglobe winter wonderlands.

Typically, when we photograph at night, we have our camera, tripod, and cable release all good to go.  We open the shutter, possibly light paint, and then close the shutter after the extended exposure.

This first shot of Pittsburgh’s Allegheny County Courthouse and Jail, (1888), demonstrates a typical 12 second exposure.  But the image isn’t showing the snow that is falling on the scene.  That is because the snow is never in the same part of the sky for more than a second.

Look closely – you can see through the car, as it was only there for half of the time.  Once it drove out of the scene the camera kept exposing and revealed what was behind it – the yellow double line, the bricks from the building, etc.  Direct light is the only thing that can pass through a picture and be forever etched into the image. 

Note all the streaks of light – these are the head and rear lights of the cars driving by.  The tallest red lights were from a truck, I always like getting different levels of lights from all the types of vehicles that pass by.   Snow, unlike rain, is white and reflective.  So by using a flash, not a flashlight, we can freeze snow forever in the photograph. 


In the second image, I used a Nikon SB910 at 1/8 power off camera.  I stood at a 90 degree angle to the right of the camera and manually popped the flash to shoot across the scene.  This was important because I didn’t want any extraneous light from the flash to be lighting up the building and background. 

I fired the flash 3 times so it could “light up” more snow. My only issue with this image is that the snow is blue.  I had set my white balance in camera to 3200 kelvin to cool down the orange light coming from the sodium vapor street lamps.  But a flash’s color temperature is set to daylight or 5500 kelvin, which when mixed with the cooler white balance of the camera creates blue snow. I could set my in camera WB to 5500 to match the flash but that would be a 2000+ kelvin change in how I wanted the scene to look.  The snow would be white but the rest of the image would be under an ugly orange cast.  Even if I cooled it down post, the snow would have changed to blue again because we are globally turning the whole scene cooler.

An easy fix is to convert the image to Black and White like I did in the third photograph.  This scene actually looks better stripped of color.  The formidable fort of a jail appears even more ominous and the snow is of course white.  However black and white isn’t the solution for all photographs. The best way to capture white snow with the cooler night color temperatures is to use a CTO, Color Temperature Orange, filter over your flash. 

The CTO filter can convert the 5500K of the flash to match the cooler white balance that you have chosen in camera. CTO gels come in a variety of “cuts” – here is a breakdown of the different gels and what they convert to: Full CTO converts 5500K – 2900K 3/4 CTO converts 5500K – 3200K 1/2 CTO converts 5500K – 3800K 1/4 CTO converts 5500K – 4500K 1/8 CTO converts 5500K – 4900K   You can purchase a sheet of these gels inexpensively and use them over a variety of flashlights or flashes They are also available in convenient kits by Honl, Rogue, and Rosco.   The first step in figuring out what gel to “match” the scene is to take a test shot to figure out your ambient light and what in-camera WB setting will look best.  I typically shoot somewhere between 3800k-2900k depending up on the light source in the night scene.  Knowing that, I always bring these three CTO gels – 1/2, 3/4, and full cut.  


In last two shots of the Allegheny Observatory my camera’s WB was set to 2900 and I used a full CTO gel over the flash. 

This time I angled the flash under but about a foot in front of the flash and fired up.  That angle was lighting up the snow better and the closer snow made it look bigger.  You have to make sure you are not firing into the lens, having a shade not only helps prevent flare but also restricts the amount of snow from landing directly on the lens.

  I used 1/8 power and fired 3 times – freezing the snow falling directly in front of the lens. Be conscientious of how many times you pop the flash.  Three times seemed to be the perfect amount for how the snow was falling this night. 

The last shot shows when I fired the flash 5 times and lit up too much snow and I feel it takes away from the rest of the picture. The snow was also a cold dry snow that wasn’t getting my camera that wet.  Typically I would bring an Kata Elements cover to protect the camera from getting wet.   So when the weather outside seems frightful, forget that fire so delightful, grab  your flash and CTO gels and Let it Snow, Let it Snow, Let it Snow!

Black & White & Color

Posted on 5 Comments

My family gave me my first camera when I graduated from college.  I’m not sure why they gave it to me as I had not shown any interest in photography up to that time.  I was a Theater major and made short silly films with my buddy Jonny on our designated film nights.  I was definitely the creative type but hadn’t found a voice yet.

So, I took that camera on a six week journey across the United States and fell in love with directing the still moment.  The camera was natural in my hand and my eye immediately sought out strong visions.  I think I had shot about 60 rolls of film by the time I got to the Grand Canyon – and I ran out of film.  So I strolled into the gift shop, but all they had was black and white film.  Geesh, were my images going to look like expressionistic silent films now?

Well, when I finally got my 80+ rolls of film back from the lab it was the black and white that struck me the deepest.  It was a new way to see the world and I was addicted.  I shot 90% B&W for the next ten years and I feel that by doing that, my composition thought process was strengthened.  B&W lends itself to a very graphic and/or documentary style of work.  We are influenced by the shadows instead of the colors.  Texture and contrast are easily enhanced.  Black and White is the true 50 Shades of Grey!

Looking back at my last few years of work I realize I have become more of a color shooter.  Those graphic nights are now filled with blues and oranges battling for power.  When shooting digital, I always capture RAW color in-camera. I then decide how to process it when I get home to my Lightroom.  Some I definitely know will be B&W and I compose accordingly.  Others I don’t know until I start developing.  My rule of thumb is if the color isn’t playing a major role in the story then consider stripping it out.  Either way, it should be a decisive choice.

Below are some examples of what the images look like in both color and black and white – I’ll walk you through my thought process.

For this image I was first drawn to the gold reflecting on the river.  I wanted to enhance the color further by shooting at a shallow depth of field.  This created a very pleasing bokeh background of colors and shapes.  The focal point is the solid remnant of the pier playing against the movement of the currents. I only saw it as a color image but it isn’t bad in B&W, the color turns into a pleasing highlight contrast and there is a timeless quality to it.  Feel free to click on the images to get a larger look.

I immediately saw this Under the Manhattan Bridge image in B&W.  Steel and stone always look stronger in black and white and it enhanced the overall structure of the scene. The pleasant surprise was how it also gave more separation/movement to the clouds.  The stars on the left hand side are also easier to see on this moonless night.

In the last image I was drawn to the quickly moving clump of clouds and wanted to play them in an abstract way against the bridge.  Again I don’t mind the color – in fact I like the yellow light on the main cable lines.  However it is easier to influence the contrast and detail in black and white and it lends itself to this image even more.

I really enjoyed this exercise. It reminded me to be more thoughtful of the entire process of seeing. Look purposefully for color and compositions that will lend themselves to black and white.

Which versions do you like and why?

Lights Out, Big City

Posted on 5 Comments


One week ago, Sandy crippled the Northeast – towns were destroyed, people were stranded in their homes, and a lot of us were left in the dark.

We take for granted the power that fuels the infrastructure of a city.

Last week we literally had that power taken away from us.

What amazed me the most was the call to action that spread over the social media waves.

There were floods – and people came with pumps;  there was darkness – and people brought light; when our most basic necessities: food, water, and gas were suddenly lost, people did not riot.

Instead they rushed to each other’s aid.

Yes, mistakes were made but the good in humanity persevered.

NYC has been through a lot in the last 11 years and perhaps those experiences aided our first instinct being to help.

Nancy and I foolishly went out during the night of the storm with a tripod and camera to document our neighborhood in Brooklyn.

The neighbors that we pass every day were coming together to help one another and share their experiences. We had all been locked in our homes during the storm without any news of what was going on.  Ironically the bar across the street from us was open throughout Sandy’s invasion – it was a true meeting place and the satellite TV was our only source of information.

As a photographer – I was a witness to a very surreal experience.

The Bright Lights of the Big City had been turned off.

The NYC skyline was lit only by the full moon and I knew I had to document it.

By Thursday the lights were starting to come back slowly – one of the first buildings “back” was the Freedom Tower.  I went to a familiar place along the Brooklyn side of the East River to capture the darkened skyline.  Compare it to the wider shot taken earlier this year from the same location and you realize how many people were put out of their homes and how much power was truly lost.  The grid works in mysterious ways, for example the image of the Brooklyn Bridge from the dock shows the fist set of lights coming from Manhattan are out. In the last image, you can see how the Manhattan Bridge is half in and half out of darkness.

As my friend and I explored the City Hall/Downtown area, the only lights we saw were coming from police cars, bicycles, and people walking around with headlamps and flashlights.  Well lit, bustling streets were now eerily quiet and sunken into an even darker shadow under the skyscrapers.

Technically speaking a typical exposure under the lights of a city are fraction of a second.  But now, working under the full moon and ambient light coming from cars my exposures were averaging 3 minutes at f/11 at 200 ISO.

These longer exposures, hopefully never again to be experienced, created a look at the city that hadn’t been witnessed in many years.

We live in strange and challenging times – but to me this was another example of how we become stronger with adversity and how the true lights of the cities will never be blown out.

So keep creating, keep helping, keep sharing, and keep living.

Night Photography Seminar at Photo Plus

Posted on

Will you be in New York next week for the largest Photo Trade Show in the US – Photo Plus?
If so – you should join me and 3 other incredibly diverse photographers for a 2 hour seminar on Thursday October 25th from 4-6pm.
Whether you are new to the night or want to improve your technique, you are bound to gain more inspiration and knowledge from this hand picked panel of night photographers that I am very honored to be a part of.

The seminar is called – Mastering the Night:  From Gaining Access to Choosing Gear to Perfecting Technique and More.

I’ll be breaking down what gear works best to successfully create an image in the many different night environments.  My day job at B&H lets me test a ton of toys and I’ll be bringing that knowledge to the table.  I’ll share with you the benefits and drawbacks to the latest crop of DSLRs and Evil cameras as well as the viability of film cameras that can create longer exposures than digital SLRs.  There are so much gear for photography, but I’ll shine a light on the key accessories that you’ll definitely want to have in your bag when the sun goes down.

Steve Duncan, urban historian and photographer, who documents the unseen infrastructure of metropolises all over the world will be sharing his images and adventures.  He will give us insight into gaining access from unthinkable locations as well as how to safely navigate through tunnels, towers, and aqueducts!  If you haven’t seen the 30 minute film on Steve called UNDERCITY by Andrew Wonder – watch it now.  Urban exploring is dangerous enough, but to film Steve as he leads us through abandoned subway stations, canals, and climbs to the top of bridges is simply mind blowing.


Linda Rutenberg, a professional fine art photographer, author of 5 books, and teacher for the last 30 years will bring us gently back to earth.  Linda’s Garden at Night series is ingenious.  By choosing the night time to capture some of the most famous gardens in the world  we are shown a very special time when “plants and flowers possess a kind of luminescent elegance, reflecting light from their surface”.  Her images are surreally sumptuous and she will be sharing her soft lighting tips as well as her story on seeing a project through from inspiration to completion.


And finally, moderator Jill Waterman, author of one of the best books on night photography – Night and Low Light Photography will showcase  recent work from the night photography community before opening up floor to discussion.  Jill is the senior editor of the ASMP Bulletin and Editor of PDNedu. Her global series on The New Year’s Eve Project depicts how humans all over the world have been celebrating.


I want to thank Jill for organizing this very unique class – Night Photography has been one of the fastest growing photographic genres over the last 5 years and part of the beauty is the unseen mystery of the night.

So come take the next step and be inspired to see better in the night!